18 October 2011

Bois D'Arc Cigar Pens

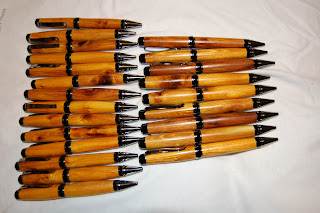
Dad is leading a Woodbadge course (a leadership training course for scout leaders) and wanted to present his staff with a memorable gift. He decided pens made from wood collected at the scout camp where the course will be held. After talking to the park ranger, they found some Bois D'Arc that had been cut and added to a brush pile. We were going to need 20-25 pens for the group.

We started the project with three 3.5" diameter logs 24-30" long. Our first order of business was to cut logs down to the proper size and allow them to dry. We cut the blanks using the band saw and a magnetic fence. The squared billets of bois d'arc were about 3/4"x3/4", we painted the ends with Anchor Seal and stacked them to dry in the shop.

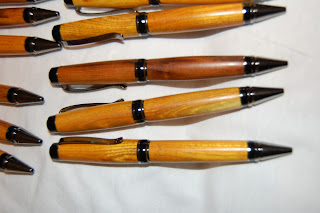
While we waited for the billets to dry, we began trying to decide on the perfect pen kit for this project. We looked through Craft Supplies and Penn State Industries catalogs cover to cover. Pop had to make the final decision..... Cigar Pen in black titanium from Craft Supplies. He also ordered EEE polish and Shellawax to finish the pens.

Pop came down on Friday afternoon and we started working on the pens after the girls went to bed. That night we cut, drilled out and glued up enough blanks for 25 pens. The next morning we began turning pens. I had only turned one cigar pen prior to this weekend and royally fouled it up. The first few pens went slow as we tried to make sure we were getting everything right. Then we had to take a break from the shop to watch the Aggies beat baylor Whoop! That evening we started turning again and each pen offered a new surprise. As the pen count grew we began to notice that the pens went together much better if the blank was trimmed down very close to the brass tubes. By the end of the night we had close to 16 or 18 pens ( I lost count). Sunday Amy was on call and Pop, Charley, AnnMarie and I continued the pen making journey. We finished up around lunch. The EEE polish and Shellawax produces an impressive finish for how fast it can be applied.

After lunch Pop wanted to try his hand at the lathe on some key ring kits. The key rings will be given to a group of Venture Scouts that will be visiting the Woodbadge group during the week. It didn't take long and he was producing some very nice bois d'arc key chains in a variety of shapes and designs. I only got a picture on the first of the horse apple key chains, but the rest are equally impressive. I also think he might have gotten bitten by the woodturning bug. :)

I had a blast working on all these pens with Dad. That's what turning is all about, having fun.

Now for the Pictures!!


I am not sure what the shadow is in some of the pictures. Please excuse the poor photography.
20 June 2011

Finished Baby Bed

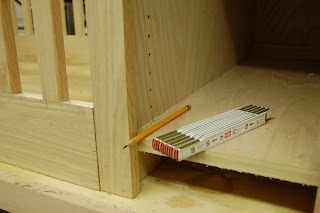
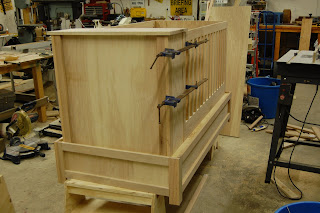
Alright so still not much turning goin on but I did finally finish the baby bed.... almost. I am waiting on the delivery of some drawer pulls, then it will b e completely finished. However we moved it into the baby's room and replaced the old white crib.

Lessons learned from this project:
Don't buy big box store wood. It is warped.
Don't take the measurements in the plans as Gospel, make measurements from the actual projects when fitting things together. The cuts probably do not match exactly to what the plans state.
Be flexible and maintain the ability to redesign if something does not work out just right.
That being said, you also need to recognize when it would be better to start over.
Be wary of "stainable" wood filler. They lie.

Now time for some pictures.


Just moved it in.


 A picture of me and AnnMarie as she tries out her new bed for the first time.


A new angle.


For my first real honest to goodness flat woodworking/furniture project it turned out better than I expected.

07 June 2011

Baby Bed

I am in the process of building a baby bed for the new baby that should be arriving any day now. This is the primary reason I have been neglecting the lathe and blog. Anyway the bed is made out of red oak and should be finished this coming weekend. Hopefully I can finish before the baby gets here. Ok now for the pics.


18 April 2011

Cherry Bowl

It has been a busy month or so... I finally got around to starting a new turning project. Over the winter I visited Wood World in Dallas, TX and found a piece of 12x12x3 cherry for $8. It had a crack in it, but for the price I decided I could work around that.

This project spanned several nights. I filled the outer crack with super glue and fine saw dust, the inner crack I tried filling it with blue inlay dust. However the blue material was too coarse to fill the crack fully. I sanded a good deal of it out and replaced it with saw dust. I sanded it to 400 grit and then finished it with 2 coats of danish oil. This is a thick walled bowl that feels good to hold and at the moment is doing a fine job holding oranges on the kitchen table.

Now time for the pictures.


My next turning project will be a shallow bowl from a piece of black mesquite I have sitting on the rack.

17 February 2011

Shift knob

Tonight I turned a shifter knob for my truck. I turned it from a piece of persimmon branch that I picked up from the farm I grew up on. I chose persimmon because of is nice grain pattern and the light color. I am hoping that with a light oil finish the wood will develop a nice patina. It was a fairly simple project, so there might be more shifter knobs to come. I hope to have pictures soon.

08 February 2011

Clean upTo

Tonight I swept up all the shavings from the past few turning days and transfered them to the goat shed. With the freeze coming tonight, it should help those new baby goats.

24 January 2011

Collection Plate, Cedar Pot, and a Candy Dish

I am currently working on making four collection plates to be used in a new service at Christ Episcopal Church. I am making the plates from 2"x12" Swamp Ash blanks. Swamp Ash seems to be a fairly soft wood, requiring sharp tools and sanding sealer to prevent tear out. Fortunately, being a soft wood, it sands rather easily. After sanding to 240, I applied a coat of WATCO Danish Oil and applied steel wool while on the lathe. The fine steel wool seemed to polish the wood and oil, bringing out a better finish than just oil alone. Below is a picture of the prototype collection plate. I still have 3 more to make as similar to this one as I can.


Earlier this month I turned a hollow form from cedar. The shape was inspired by southwestern pottery. As I progress the opening at the top should continue to shrink. The finish on the pot is shellac.


Last Friday night I turned a small candy dish from a piece of Argentinian Lignum Vitae. I really like working with this wood. It gives off a pleasant citrus aroma when it is cut. As dense and oily as the wood naturally is, it polishes up quite nicely. I finished this bowl with WATCO Teak Oil.


18 January 2011

Shop Time

The past few weeks I have been re-arranging the shop. Needless to say it still needs about a days worth of spring cleaning.

I cut 4- 12"x12"x2" blanks from some Swamp Ash this evening. They will be turned into collection plates that will be used in a new service at our church. The new service debuts on the 30th, 12 days to design, turn, and finish 4 collection plates. I should be able to finish on time. We shall see.